Quick Start & Technical Manual
New to SmartEye?
- Check out the Full SmartEye Technical Manual: Access Manual (v1.7)
- Includes setup instructions, advanced features, and troubleshooting.
Before Using SmartEye
Compatible Mounts
SmartEye works with motorized equatorial or altazimuth mounts that support sidereal tracking. SmartEye’s built-in stacking, alignment, and automatic field de-rotation compensate for tracking errors.
Tip: Use 5–10 second light integration times (exposures) for best results as it allows SmartEye to quickly accumulate and enhance your image while minimizing the impact of any residual mount tracking errors.
Focuser Compatibility
- Fits 2” focusers
- Features M54 male and M48 female threads for 2” filters.
- Use a 1.25" adapter (not included) for 1.25" focusers
Tip: Make sure SmartEye is firmly secured in the focuser. It has some weight to it, and you don’t want it slipping out.
Telescope Recommendations
- Compatible with any telescope that accepts a 2" eyepiece
- Best with scopes f/7 or faster
- Slower scopes benefit from a focal reducer
- A low-profile diagonal may help maintain backfocus
Tip: Even a 4" refractor + SmartEye can outperform the naked eye view through a 20" scope!
Power Requirements
SmartEye is a high-performance device that needs 5V @ 3A (with peaks above 3A).
We include:
- A USB-C to USB-C cable for direct power. Only use high-power USB-C cables that support up to 5A.
- A 12V to 5V/6A adapter for field use (2.1mm DC barrel → USB-C).
12V DC Battery or Power Adapter to SmartEye device (USB-C to USB-C)

Tip: For best results, always use the included USB-C cable and 12V to USB-C adapter. If you are using a small powerbank, ensure it is a model that supports at least 30W with Power Delivery (PD).
⚠️ Important Safety Note
For proper operation and to avoid damage to your SmartEye:
✅ Only use the included 12V-to-USB-C power adapter, or a USB-C PD-compliant power bank rated at 30W or higher with a capacity of 30,000mAh or more.
❌ Do NOT use third-party USB-C adapters. Some of these (including those from Mele computers) can output 12V directly without proper USB Power Delivery (PD) negotiation. These can cause damage to SmartEye and void the warranty.
❌ Do NOT connect 24V or 48V power sources to the included 12V-to-USB-C power adapter, as this can damage both the adapter and SmartEye, and will void the warranty.
🔎 Always confirm your adapter supports USB PD and negotiates power properly. If in doubt, use only the provided power adapter.
microSD Card (Sold Separately)
- Insert label facing inward (upside down) until it clicks.
- Format via SmartEye Menu → Settings → Storage → Format SD Card
- Always eject via Menu → Settings → Storage → Eject SD Card to avoid data corruption.
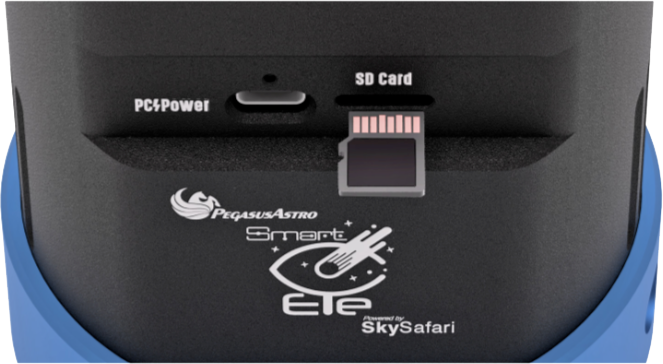
⚠️ Warning: Never force remove the SD card while SmartEye is powered on or saving data.
Using SmartEye


Booting up the Device
- Remove protective caps.
- Attach 2” barrel adapter (add filters if desired, we highly recommend a UV /IR Cut filter)
- Mount SmartEye:
• Use a diagonal for refractors/SCTs.
• Insert directly for Newtonians.
- Connect power:
• USB-C → SmartEye
• Connect the other USB-C end to the included power adapter (for 12V battery use), or directly to a USB-C power bank (5V @ 3A).
SmartEye powers on automatically.
You’ll see a red LED → boot logo → fan/TEC startup.
Look through the eyepiece and Adjust the Diopter ring for a sharp display when prompted, then press the Astro Crown (rotary knob) on the side of SmartEye to see the main menu.

Tip: Make sure the protective sticker has been removed from the eyepiece lens by slowly peeling back the red tab.
Menu Navigation
- Press the Astro Crown (rotary knob) located on the side of SmartEye to open the menu.
-
Turn to scroll, press to select.

Main Menu
Live View
New Observation
Resume Observation
Settings
- Display
- Screen Brightness
- 5% to 100%
- Crosshair Overlay
- Focus Assist
- Alignment Error Msg
- Modes
- Color or Monochrome
- Screen Brightness
- Light Sensor
- Sensor Temperature
- 20, 10, 5, 0 (° Celsius)
- Integration Time
- 5s, 10s, 15s, 20s, 25s, 30s
- 5s, 10s, 15s, 20s, 25s, 30s
- Take Dark Frames
- Clear Darks
- Alpaca Mode
- Adjust Fan Speed
- Sensor Temperature
- Localization
- Wi-Fi Region
- Storage
- Storage & Capacity
- Eject SD Card
- Format SD Card
- Save Raw FITS
- General
- About
- SmartEye WIFI
- Guest View Sharing
- Web Dashboard
- Reset to AP Mode
- Factory Reset
Shutdown
Live View & Focusing
- Live View to begin with rapid 0.5s exposures for fast focusing.
- Adjust your telescope’s focuser knobs until the image is sharp.
- Once you are happy with the focus, you can start a New Observation.
- Enable Focus Assist to aid with focusing under Settings -> Display -> Focus Assist.
Start a New Observation
- Select New Observation” in the SmartEye Main menu.
- Stacking begins accumulating light immediately:
- Starts in monochrome
- Color and detail build over time
- Watch as your image becomes brighter, clearer, and more colorful in real time.

Adjust Gamma (Image Tone) On the Fly
While stacking, turn the Astro Crown (rotary knob) to change gamma:
- Brighten faint structures
- Darken sky background
- Improve contrast in real time
Your changes apply instantly to the display.
Resuming an Observation
Exited the menu or changed settings? Use Resume Observation to continue from where you left off - no need to restart.
Set Light Integration Time
Menu → Settings → Light Sensor → Integration Time
Choose from 5 to 30 seconds depending on your target.
- Short = good for bright objects or mounts with poor tracking
- Long = better for faint nebulae or slow f-ratio scopes
SmartEye uses your setting throughout the session for optimized results.
Connecting to SmartEye
Connect to the SmartEye Hotspot
- Open Wi-Fi settings on your device
- Join the network: SmartEye-XXXXXX
- Enter the default password: PWXXXXXX (shown in Menu → Settings → General → SmartEye Wi-Fi)
Admin Web Dashboard
- In a browser, go to: http://smarteye.local
-
If the above address does not work, please access http://10.42.42.1
-
- Log in to the admin area (button on top right - default password: smart).

Use the dashboard to:
- Control SmartEye settings
- View system info
- See your latest observations
Guest View Sharing
Let others watch your live results - no app needed!
Guests can visit http://smarteye.local or scan the Guest View QR code via:
Menu → Settings → General → Guest View Sharing

They’ll see:
- Latest stacked image
- Integration time
- Total stack duration
- Capture count
Tip: Guests must be on:
- The SmartEye Wi-Fi hotspot, or
- The same Wi-Fi network (if SmartEye is in client mode - see Manual)
Using SmartEye with SkySafari
*Requires SkySafari Pro v7+ (iOS/Android, sold separately)
Configure in SkySafari
- Open SkySafari → tap Observe in toolbar
- Select SmartEye & Imager Configuration
- Tap + Add Device → choose SmartEye
- Tap Auto-Detect → tap Next then Save Preset

Connecting to SmartEye
- Tap the Camera icon in the SkySafari Toolbar → open Camera screen
- Tap Connect → SkySafari will auto-connect (You may need to enter the SmartEye Wi-Fi password)
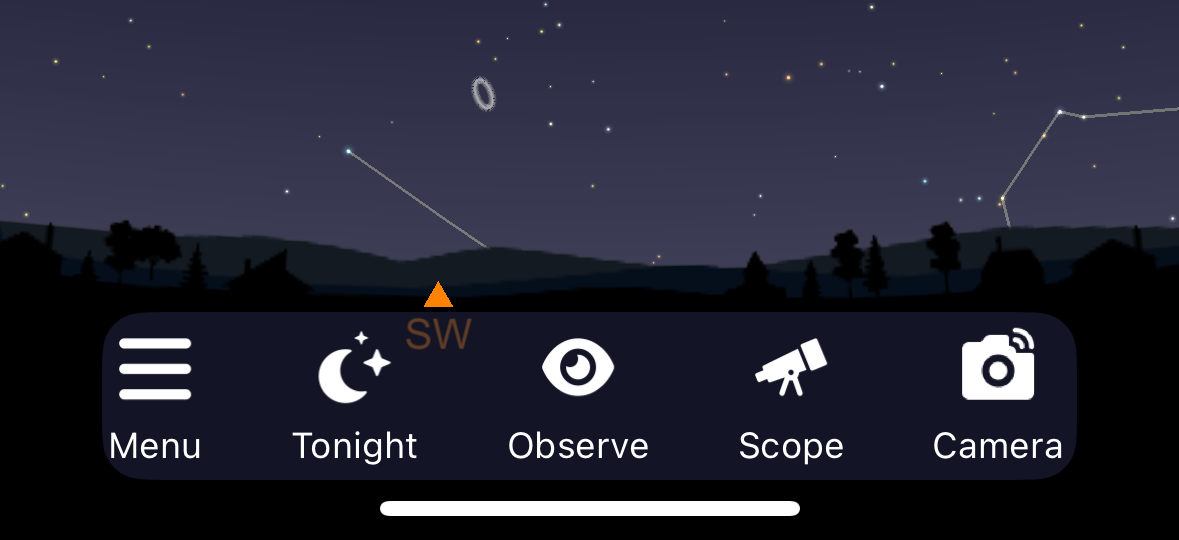
Plate Solving
- Tap the Plate-Solve button located on the Camera screen toolbar.
- Enter your telescope’s focal length (mm)
-
- SmartEye uses the last entered value, current active FOV indicator with a telescope, or defaults to 600mm
- SmartEye uses the last entered value, current active FOV indicator with a telescope, or defaults to 600mm
- Tap Request Solve. If the plate-solve is successful and you're connected to a telescope mount, a popup will appear asking if you’d like to align your telescope to the solved coordinates. Tap Align Telescope to confirm. The bullseye indicator in the SkySafari chart will also update.

How to Connect SmartEye, a Wi-Fi Compatible Mount, and SkySafari Together
Option 1: Use SmartEye as a Network Hub (Field Setup)
- Connect your Wi-Fi capable mount to the SmartEye Wi-Fi hotspot. Your mounts app or web page should allow you to configure this connection.
- Connect your mobile device to the same SmartEye Wi-Fi network.
- SkySafari should now be able to detect and control both SmartEye and the mount simultaneously over this shared network.
Option 2: Use an Existing Local Wi-Fi Network (Home Setup)
- Connect your mobile device to the SmartEye Wi-Fi hotspot.
- In the Web Dashboard (http://smarteye.local/dashboard) connect SmartEye to your local Wi-Fi network.
- Connect your mount to the same local WiFi network.
- Connect your mobile device to the same Wi-Fi network.
- SkySafari should now be able to detect and control both SmartEye and the mount simultaneously over this shared network.
Note: Most telescope mounts do not support the 5 GHz Wi-Fi band, so it’s important that SmartEye operates its access point on the 2.4 GHz band to ensure compatibility.